Ever wondered how to transfer your beloved Spotify playlists to Apple Music without losing all your favorite tracks? Well, you’re not alone! Millions of music lovers face this dilemma when switching streaming platforms. Don’t panic—this guide will walk you through every step of the process, ensuring your music journey stays seamless and stress-free.
Switching from Spotify to Apple Music doesn’t mean starting from scratch. Your playlists, with all their carefully curated songs, can easily make the leap. Whether you’re tired of Spotify’s ads, want to explore Apple Music’s exclusive features, or simply crave a change, transferring your playlists is simpler than you think.
In this article, we’ll break down the entire process, from exporting playlists on Spotify to importing them into Apple Music. We’ll also cover some handy tools, tips, and tricks to make the transition smoother. So, grab your headphones, and let’s dive in!
Read also:Dilbert Comics A Mustread For Every Office Worker Looking To Survive The Madness
Table of Contents
- Why Transfer Your Spotify Playlist to Apple Music?
- How to Export Your Spotify Playlist
- Importing Playlists into Apple Music
- Tools You’ll Need for the Transfer
- Step-by-Step Guide to Transfer Playlists
- Common Issues and How to Fix Them
- Tips and Tricks for a Seamless Transfer
- Spotify vs Apple Music: What to Expect
- Frequently Asked Questions
- Final Thoughts
Why Transfer Your Spotify Playlist to Apple Music?
Let’s face it—both Spotify and Apple Music have their own unique strengths. But why would someone want to switch? Here’s the lowdown:
First off, Apple Music offers lossless audio quality, which is a big deal for audiophiles who care about sound clarity. Plus, it has Apple’s ecosystem integration, making it super convenient if you already use other Apple products like iPhones, iPads, or Macs.
Then there’s the exclusive content. Apple Music often premieres albums and tracks before they hit other platforms. If you’re into discovering new music or following artist exclusives, this could be a game-changer for you.
How to Export Your Spotify Playlist
Exporting playlists from Spotify might sound tricky, but it’s actually pretty straightforward. Follow these steps:
Step 1: Use Spotify’s Web Player
Log into Spotify’s web player via your browser. This will give you access to all your playlists in one place.
Step 2: Select the Playlist You Want to Export
Choose the playlist you want to transfer. If you have multiple playlists, repeat the process for each one.
Read also:Matt Rife And Kate Beckinsale A Deep Dive Into Their Connection
Step 3: Copy the Playlist Link
Click on the three dots next to the playlist name and select “Share.” Copy the playlist link. This link will come in handy when using third-party tools later.
Alternatively, you can manually copy the names of the songs and artists from the playlist. It’s a bit more time-consuming, but it works!
Importing Playlists into Apple Music
Now that you’ve exported your Spotify playlists, it’s time to bring them into Apple Music. Here’s how:
Step 1: Create a New Playlist in Apple Music
Open Apple Music on your device and click on the “+” icon to create a new playlist. Give it a catchy name!
Step 2: Add Songs Manually
Search for each song in Apple Music and add it to your newly created playlist. Yes, it’s manual labor, but hey, it gets the job done!
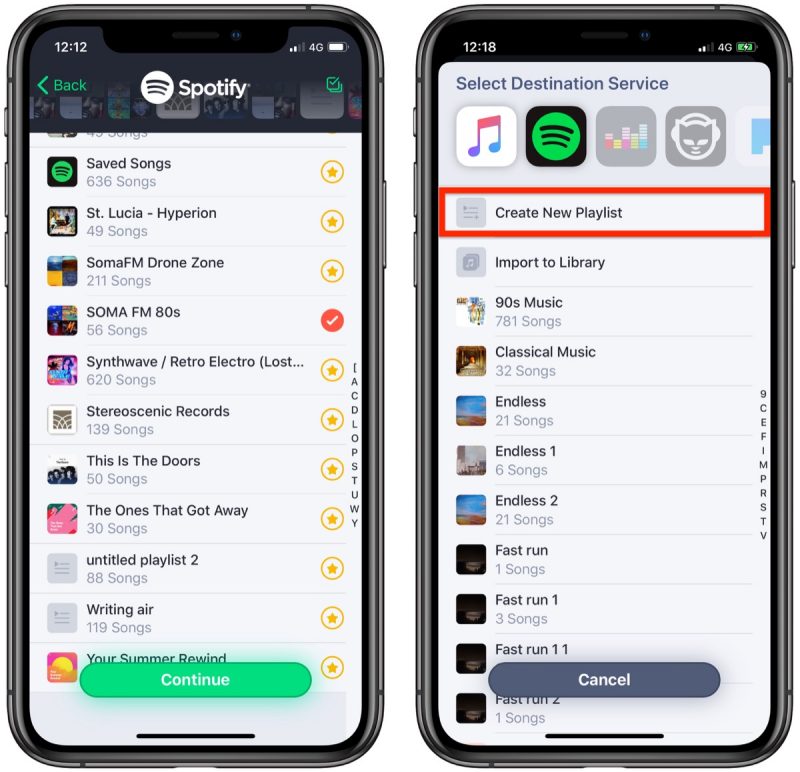
Step 3: Use Third-Party Tools
If you’re not a fan of doing things the hard way, third-party tools like SongShift or MoveMyMusic can automate the process. We’ll dive deeper into these tools later.
Tools You’ll Need for the Transfer
There are several awesome tools out there designed specifically to help you transfer playlists between platforms. Here are a few of our favorites:
- SongShift: A user-friendly tool that lets you transfer playlists with just a few clicks. It supports both Spotify and Apple Music.
- MoveMyMusic: Another reliable option that offers a free trial period. It’s great for transferring large playlists.
- Playlist Tools: A browser extension that works wonders for exporting playlists from Spotify.
These tools save you tons of time and effort, so they’re definitely worth checking out!
Step-by-Step Guide to Transfer Playlists
Ready to make the switch? Follow these easy steps:
Step 1: Choose Your Tool
Decide which tool you want to use. For beginners, SongShift is a great choice because of its simplicity.
Step 2: Connect Your Accounts
Log in to both your Spotify and Apple Music accounts within the tool. This ensures seamless integration.
Step 3: Select Playlists
Pick the playlists you want to transfer. You can choose individual playlists or transfer all of them at once.
Step 4: Start the Transfer
Hit the “Transfer” button and let the tool do its magic. Depending on the size of your playlists, this might take a few minutes.
And voilà! Your playlists are now on Apple Music.
Common Issues and How to Fix Them
Even the best-laid plans can hit a snag. Here are some common issues users face during the transfer process and how to fix them:
- Missing Tracks: Sometimes, songs aren’t available on Apple Music. In such cases, try searching for alternative versions or similar tracks.
- Slow Transfer Speed: Ensure you have a stable internet connection. If the issue persists, try restarting the tool.
- Account Connection Problems: Double-check your login credentials and ensure both accounts are active.
Don’t let these hiccups discourage you. With a little patience and troubleshooting, you’ll be good to go!
Tips and Tricks for a Seamless Transfer
Here are a few pro tips to make your transfer experience smoother:
- Backup Your Playlists: Always keep a backup of your Spotify playlists before starting the transfer.
- Test the Tools: Try out different tools to see which one works best for you.
- Organize Your Playlists: Before transferring, clean up your Spotify playlists by removing duplicates or irrelevant songs.
These tips will help you avoid unnecessary headaches and ensure a successful transfer.
Spotify vs Apple Music: What to Expect
Both platforms offer fantastic features, but here’s a quick comparison to help you decide:
- Sound Quality: Apple Music wins hands down with its lossless audio.
- Interface: Spotify’s interface is user-friendly and intuitive, while Apple Music’s is sleek and modern.
- Exclusive Content: Apple Music frequently releases exclusive tracks and albums.
Ultimately, the choice depends on your personal preferences and needs.
Frequently Asked Questions
Q: Can I transfer playlists for free?
A: Yes, some tools like SongShift offer free plans. However, premium plans usually come with additional features and faster transfer speeds.
Q: Will I lose my playlists if I cancel my Spotify subscription?
A: Nope! Once transferred, your playlists will remain on Apple Music, regardless of your Spotify subscription status.
Q: How long does the transfer process take?
A: It depends on the size of your playlists. Small playlists might take a few minutes, while larger ones could take longer.
Final Thoughts
Transferring your Spotify playlists to Apple Music doesn’t have to be a daunting task. With the right tools and a bit of patience, you can make the switch effortlessly. Remember, the goal is to enjoy your music without any interruptions.
So, what are you waiting for? Start transferring your playlists today and explore the world of Apple Music. Don’t forget to share your experience in the comments below and check out our other articles for more music-related tips and tricks!